Adobe InDesign
...is available in the Trible Media Center. We have InDesign CC on all of our Macs.
InDesign is much more professional than Microsoft Publisher and is geared towards creating documents that would be sent off to a printer or a publisher. InDesign gives maximum control over color, printing and placement of text, images and other objects. Use InDesign to create documents that require precise layout and creative control. You can create handouts, newsletters, posters, manuscripts or books.
InDesign is not for beginners. A user should understand the basic layout and tool function of Adobe Photoshop and Adobe Illustrator since it combines elements of both. All Adobe products of the Creative Suite are tightly integrated and work seamlessly together.
LinkedIn Learning - Adobe InDesign 2021 Course
Official Adobe InDesign Tutorials
InDesign Template - Design Freebies Sites
Graph Paper for Designing Layout
![]()
Basics Tasks in Adobe InDesign
Saving a document in InDesign cannot be opened with anything but an Adobe product. The extension will appear as ".indd". Use Export to save your file as a .pdf, .jpeg or .png.
The Media Center has the CC version of InDesign.
Inserting a picture is done with the file -> place command. It references the file path of that object and will update when changes are made to that particular object in other Adobe programs. There is no "insert picture" command.
Layout is done when a new document is created. If you know you will be working with columns, you can initiate it here.
Master page - acts as a template for all other preceding pages.
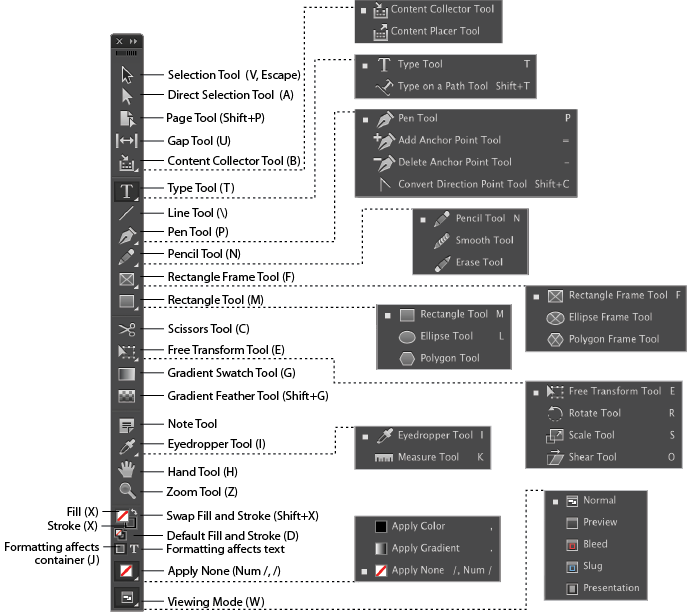
Inserting text - a text box must be created in order to use text on a page. Use the "T" button on the toolbox and drag a square where you would like the text. Formatting of the text can be done with most of the controls on the top bar.
Inserting columns - a text box must be created before you can insert a table or columns.
Inserting bullets or numbering - when you have a text box, the bullet feature and numbering options appear at the top bar towards the middle.
Anchor point - an anchor point refers to a point on the page that is making up a vector object. Vector objects consist of reference points rather than pixels. A basic straight line has only two anchor points by default. Reference point A and reference point B. Vector files are typically smaller than raster/pixel files.
Stroke - stroke is the outline of an object. This can be any color in a palette. This can also apply to text.
Fill - the space surrounded by anchor points is what is filled. Fill consists of a color and can be turned off or different from the stroke color.
Enabling guides - right clicking on the page brings up a menu. Select Guides to pull up a selection of guides to use. Most appear in light blue (by default) on your document and do not print out but are used for reference only. They can be helpful for aligning objects and looking at the spaces around objects.
